Standard Component
Image
Related Links: How to Add a Component | How to Modify a Component | Editing BasicsOverview | Edit Image
Overview
Adding an image component to a Web page will assign a placeholder to the page. Once the image component has been added, you need to inform the image component what image file to apply. To apply an image to your image component, follow the steps to select an image. This separation allows you to remove the image component and not affect the image file as well as allow you to remove the image file and not remove the image component.
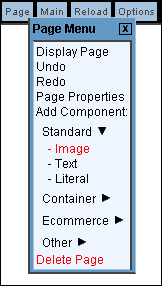
Click on "Page" in the top-left corner of the Page Editor. Click on "Standard". Click on "Image".

This option allows you to add an image or picture to the Web page.
Edit Image
-
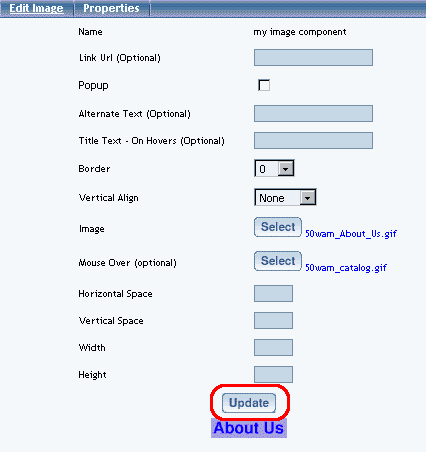
Link URL: specify a hyperlink for the image, which will essentially make the image a button. If the image is to send customers to a page on your Web site, enter in the filename of the page. For example, if you want the image to point to mytestpage.html, enter in "mytestpage.html" (without the quotes) in this field. If this image is to send customers to another Web site, you must enter in the full Web address. For example, if you want the image to link to www.anotherwebpageofmine.com, you would enter "http://www.anotherwebpageofmine.com" (without the quotes) in this field.
Popup: checkmark this option to allow your image to open links in a new window, assuming that you have a URL specified in the field "Link URL".
Alternate Text: this field allows you to specify text that will display as a pop-up tag for the image. This tag is only visible in the WYSIWYG of the Page Editor and will not be seen by visitors to your Web site.
Title Text – On Hover: text entered in this field will be displayed to visitors to your Web site if they place their mouse cursor over the image.
Border: specify the blue border width that will surround the image. If you do not want a blue border, select a border of "0".
Horizontal Align: specify whether to align the image to the left, center, right, or not at all.
Vertical Align: specify whether to align the image to the top, middle, bottom, or not at all.
Image: click on the button "Select" to specify what image file that this image component will use. When you click on the button "Select", a new window will display allowing you to choose your image.
Mouse Over: specify a second image file that will appear if the viewer's mouse cursor moves over this image. When you click on the button "Select", a new window will display allowing you to choose your image.
Horizontal Space: specify the horizontal spacing around the image.
Vertical Space: specify the vertical spacing around the image.
Width: specify the width of the image that you want to display. This will not adjust the dimensions of the image file itself, only the dimension of the image that will display on the Web page.
Height: specify the height of the image that you want to display. This will not adjust the dimensions of the image file itself, only the dimension of the image that will display on the Web page.
When you are done making your changes, you must click on the button "Update" to apply your changes to the image.

Editing Basics
Back